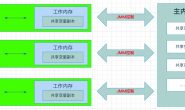
1.定义

2.
- 部件 (Component) 声明封装器和被封装对象的公⽤接⼝。
- 具体部件 (Concrete Component) 类是被封装对象所属的类。 它定义了基础⾏为, 但装饰类可以改变这些⾏为
- 基础装饰 (Base Decorator) 类拥有⼀个指向被封装对象的引⽤成员变量。 该变量的类型应当被声明为通⽤部件接⼝,这样它就可以引⽤具体的部件和装饰。 装饰基类会将所有操作委派给被封装的对象。
- 具体装饰类 (Concrete Decorators) 定义了可动态添加到部件的额外⾏为。 具体装饰类会重写装饰基类的⽅法, 并在调⽤⽗类⽅法之前或之后进⾏额外的⾏为。
- 客户端 (Client) 可以使⽤多层装饰来封装部件, 只要它能使⽤通⽤接⼝与所有对象互动即可。
3.代码示例
案例:把我们具体的数据保存到一个指定的文件当中进行写入,写入以后还需要提供读取的功能,写入和读取过程可以选择使用base64进行加密解密,可以选择使用json进行序列化
1、顶层抽象DataSource数据源接口
public interface DataSource {
    void writeData(String data);
    String readData();
}
2、具体实现类
// 利用文件来保存我们写入的数据
public class FileDataSource implements DataSource {
    private String name;
    public FileDataSource(String name) {
        this.name = name;
    }
    @Override
    public void writeData(String data) {
        File file = new File(name);
        try (OutputStream fos = new FileOutputStream(file)) {
            fos.write(data.getBytes(), 0, data.length());
        } catch (IOException ex) {
            System.out.println(ex.getMessage());
        }
    }
    @Override
    public String readData() {
        char[] buffer = null;
        File file = new File(name);
        try (FileReader reader = new FileReader(file)) {
            buffer = new char[(int) file.length()];
            reader.read(buffer);
        } catch (IOException ex) {
            System.out.println(ex.getMessage());
        }
        return new String(buffer);
    }
}
3、
public class EncryptionDecorator implements DataSource {
    private DataSource datasource;
    //通过构造方法传入原始的数据源
    public EncryptionDecorator(DataSource dataSource) {
        this.datasource = dataSource;
    }
    @Override
    public void writeData(String data) {
        datasource.writeData(encode(data));
    }
    @Override
    public String readData() {
        return decode(datasource.readData());
    }
    // 定义数据加密方法
    private String encode(String data) {
        byte[] result = data.getBytes();
        for (int i = 0; i < result.length; i++) {
            result[i] += (byte) 1;
        }
        return Base64.getEncoder().encodeToString(result);
    }
    // 定义数据解密方法
    private String decode(String data) {
        byte[] result = Base64.getDecoder().decode(data);
        for (int i = 0; i < result.length; i++) {
            result[i] -= (byte) 1;
        }
        return new String(result);
    }
}
4、JSON序列化装饰器
public class JsonDecorator implements DataSource {
    private DataSource dataSource;
    public JsonDecorator(DataSource dataSource) {
        this.dataSource = dataSource;
    }
    @Override
    public void writeData(String data) {
        dataSource.writeData(toJson(data));
    }
    @Override
    public String readData() {
        return fromJson(dataSource.readData());
    }
    // 进行json序列化
    private String toJson(String stringData) {
        Map map = new HashMap();
        map.put("content", stringData);
        return new Gson().toJson(map);
    }
    // 进行json反序列化
    private String fromJson(String json) {
        Map map = new Gson().fromJson(json,new TypeToken<Map<String,String>>(){}.getType());
        return map.get("content").toString();
    }
}
5、客户端使⽤
可以将多个装饰器组合使⽤,执⾏时从外向内依次执⾏
public class Client {
    public static void main(String[] args) {
        String salaryRecords = "Name,Salary / John Smith,100000 / Steven Jobs";
        // 装饰器混用场景
        // 对数据进行二次装饰,顺序是从左到右依次执行,先进行加密,在进行json序列号,最后在存入具体的文件中
        DataSource dataSource = new EncryptionDecorator(new JsonDecorator(new FileDataSource("OutputDemo.txt")));
        dataSource.writeData(salaryRecords);
        DataSource plain = new FileDataSource("OutputDemo.txt");
        // 输出原始数据
        System.out.println("- Data ----------------");
        System.out.println(salaryRecords);
        // 输出加密数据
        System.out.println("- EncodedContent --------------");
        System.out.println(plain.readData());
        // 输出解密数据
        System.out.println("- DecodedContent --------------");
        System.out.println(dataSource.readData());
    }
}
6、输出结果
- Data ----------------
Name,Salary / John Smith,100000 / Steven Jobs
- EncodedContent --------------
{"content":"T2JuZi1UYm1ic3ohMCFLcGlvIVRuanVpLTIxMTExMSEwIVR1ZndmbyFLcGN0"}
- DecodedContent --------------
Name,Salary / John Smith,100000 / Steven Jobs
4.
- 如果你希望在⽆需修改代码的情况下即可使⽤对象, 且希望在运⾏时为对象新增额外的⾏为, 可以使⽤装饰模式。
- 装饰能将业务逻辑组织为层次结构, 你可为各层创建⼀个装饰, 在运⾏时将各种不同逻辑组合成对象。 由于这些对象都遵循通⽤接⼝, 客户端代码能以相同的⽅式使⽤这些对象。
- 如果⽤继承来扩展对象⾏为的⽅案难以实现或者根本不可⾏, 你可以使⽤该模式。
- 许多编程语⾔使⽤ final最终关键字来限制对某个类的进⼀步扩展。复⽤最终类已有⾏为的唯⼀⽅法是使⽤装饰模式: ⽤封装器对其进⾏封装。
5.装饰器模式优点
- 你⽆需创建新⼦类即可扩展对象的⾏为。
- 你可以在运⾏时添加或删除对象的功能。
- 你可以⽤多个装饰封装对象来组合⼏种⾏为。
- 单⼀职责原则。 你可以将实现了许多不同⾏为的⼀个⼤类拆分为多个较⼩的类。
6.装饰器模式缺点
- 在封装器栈中删除特定封装器⽐较困难。
- 实现⾏为不受装饰栈顺序影响的装饰⽐较困难。
- 各层的初始化配置代码看上去可能会很糟糕。
转载请注明:西门飞冰的博客 » 设计模式—装饰器模式