1.Cobbler介绍
Cobbler可以通过网络快速安装/重装操作系统,如果说pxe+kickstart安装操作系统是大专水平,那么cobbler就是小学生难度。
Cobbler优点如下:
(1) 可以提供多个操作系统的安装,比如在安装是可以选择Centos6,还是Centos7。
(2) Cobbler客户端koan支持虚拟机安装和操作系统重新安装。
(3) 在DHCP配置文件中为需要安装的机器创建一个条目,并使用你指定的参数。
(4) 有了一个企业内部的yum源。
(5) Cobbler提供了API接口。
下面是一条cobbler定义主机条目的命令,我们只需要知道安装主机的mac地址,就可以定义对应主机的IP地址参数和主机名信息。
cobbler system add --name=linux-node1 --mac=00:0C:29:B8:B2:36 --profile=Centos-7.2-x86_64 --ip-address=192.168.100.110 --subnet=255.255.255.0 --gateway=192.168.100.2 --interface=eth0 --static=1 --hostname=test1.fblinux.com --name-servers="114.114.114.114" --kickstart=/var/lib/cobbler/kickstarts/CentOS-7.2-x86_64.cfg
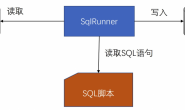
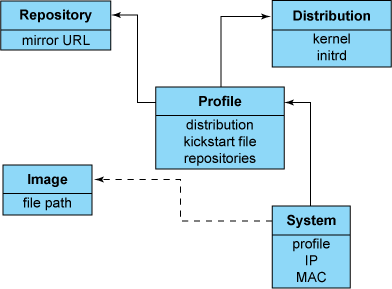
cobbler各主要组件关系如下所示:
2.Cobbler部署
2.1.环境介绍
Cobbler操作系统版本:Centos-7.2-x86_64
Cobbler服务器IP地址:192.168.100.10
2.2.部署cobbler
(1)配置好Centos源和epel源并使用yum命令安装如下软件
[root@node1 ~]# yum install httpd dhcp tftp python-ctypes cobbler cobbler-web pykickstart fence-agents
启动httpd,不然执行cobbler命令会有问题
[root@node1 ~]# systemctl start cobblerd.service
[root@node1 ~]# systemctl enable httpd
[root@node1 ~]# systemctl start httpd
下载cobbler相关组件
[root@node1 ~]# cobbler get-loaders
出现*** TASK COMPLETE ***字符表示下载成功
检查需要修改的配置:由于不同的环境,提示会不一样,只需要安装提示内容一一解决即可。
[root@localhost ~]# cobbler check
The following are potential configuration items that you may want to fix:

1 : The 'server' field in /etc/cobbler/settings must be set to something other than localhost, or kickstarting features will not work.  This should be a resolvable hostname or IP for the boot server as reachable by all machines that will use it.
2 : For PXE to be functional, the 'next_server' field in /etc/cobbler/settings must be set to something other than 127.0.0.1, and should match the IP of the boot server on the PXE network.
3 : change 'disable' to 'no' in /etc/xinetd.d/tftp
4 : enable and start rsyncd.service with systemctl
5 : debmirror package is not installed, it will be required to manage debian deployments and repositories
6 : The default password used by the sample templates for newly installed machines (default_password_crypted in /etc/cobbler/settings) is still set to 'cobbler' and should be changed, try: "openssl passwd -1 -salt 'random-phrase-here' 'your-password-here'" to generate new one

Restart cobblerd and then run 'cobbler sync' to apply changes.
解决第一个和第二个提示:设置cobbler地址和设置dhcp服务器地址
[root@node1 ~]# vim /etc/cobbler/settings
272 next_server: 192.168.100.10
384 server: 192.168.100.10
第三个和第四个提示解决:启动tftp和rsyncd服务
[root@node1 ~]# yum -y install tftp-server xinetd
启用tftp服务:
[root@node1 ~]# vim /etc/xinetd.d/tftp
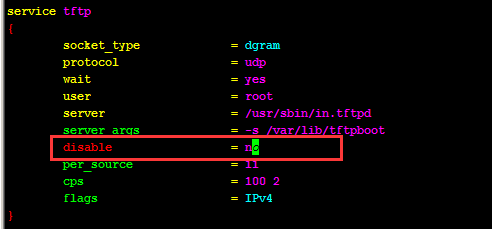
启动xinetd服务
[root@node1 ~]# systemctl enable rsyncd.service
[root@node1 ~]# systemctl enable xinetd
[root@node1 ~]# systemctl start xinetd.service
[root@node1 ~]# netstat -nulp | grep xinetd
udp 0 0 0.0.0.0:69 0.0.0.0:* 3659/xinetd
第五个提示解决:安装debmirror,这个工具是用来管理debian包的,如果你只是安装centos这个可以不用安装
[root@node1 ~]# yum -y install ftp://fr2.rpmfind.net/linux/fedora/linux/development/rawhide/Everything/x86_64/os/Packages/d/debmirror-2.16-4.fc24.noarch.rpm
因为安装了debmirror会又带来了两个新的问题,如下所示:
[root@node1 ~]# cobbler check
The following are potential configuration items that you may want to fix:

1 : comment out 'dists' on /etc/debmirror.conf for proper debian support
2 : comment out 'arches' on /etc/debmirror.conf for proper debian support

Restart cobblerd and then run 'cobbler sync' to apply changes.
解决方法:
[root@node1 ~]# vim /etc/debmirror.conf
28 #@dists="sid";
29 @sections="main,main/debian-installer,contrib,non-free";
30 #@arches="i386";
第六个提示解决:设置cobbler密码,同时也是安装服务器的登录密码
[root@node1 ~]# openssl passwd -1 -salt 'fblinux' 'fblinux'
$1$fblinux$/xj8q1V8Eqbx0sNaI//TL/
修改cobbler把生成的密码放入配置文件
[root@node1 ~]# vim /etc/cobbler/settings
default_password_crypted: "$1$fblinux$/xj8q1V8Eqbx0sNaI//TL/"
设置完成重启cobbler,再次检查cobbler出现如下提示,说明cobbler配置完成了
[root@node1 ~]# cobbler check
No configuration problems found. All systems go.
3.配置cobbler管理DHCP
3.1.Cobbler管理DHCP服务器介绍
我们知道cobbler在安装一个服务器的操作系统之前,如果知道服务器mac地址,那么就可以自定义这台服务器的主机名还有IP地址,cobbler实际是操作dhcp实现系统的IP设置,主机名设置,cobbler生成的dhcp配置文件如下。
group {
    host generic1 {
        hardware ethernet 00:0C:29:97:84:4D;
        fixed-address 192.168.100.100;
        option host-name "test1.fblinux.com";
        option subnet-mask 255.255.255.0;
        option routers 192.168.100.2;
        filename "/pxelinux.0";
        next-server 192.168.100.10;
    }
}
如果cobbler没有开启dhcp管理,那么安装的操作系统IP地址就是dhcp随机分配的,主机名就是localhost。
3.2.Cobbler管理DHCP服务器配置
编辑cobbler配置文件,开启cobbler管理dhcp
[root@node1 ~]# vim /etc/cobbler/settings
manage_dhcp: 1
编辑cobbler的dhcp管理模版,设置dhcp分配的网段,网管,dns信息
[root@node1 ~]# vim /etc/cobbler/dhcp.template
subnet 192.168.100.0 netmask 255.255.255.0 {
     option routers             192.168.100.2;
     option domain-name-servers 114.114.114.114;
     option subnet-mask         255.255.255.0;
     range dynamic-bootp        192.168.100.100 192.168.100.254;
同步cobbler配置:同步之前先重启cobbler保证所有配置生效
[root@node1 ~]# systemctl restart cobblerd.service
[root@node1 ~]# cobbler sync
同步完成之后打开dhcp的配置文件,就可以看到头部有了cobbler添加的注释,配置信息也是自己修改的模版配置信息,说明cobbler管理dhcp成功
[root@node1 ~]# cat /etc/dhcp/dhcpd.conf
# ******************************************************************
# Cobbler managed dhcpd.conf file
# generated from cobbler dhcp.conf template (Sat Nov 19 08:54:51 2016)
# Do NOT make changes to /etc/dhcpd.conf. Instead, make your changes
# in /etc/cobbler/dhcp.template, as /etc/dhcpd.conf will be
# overwritten.
# ******************************************************************

ddns-update-style interim;

allow booting;
allow bootp;

ignore client-updates;
set vendorclass = option vendor-class-identifier;

option pxe-system-type code 93 = unsigned integer 16;

subnet 192.168.100.0 netmask 255.255.255.0 {
     option routers             192.168.100.2;
     option domain-name-servers 114.114.114.114;
     option subnet-mask         255.255.255.0;
     range dynamic-bootp        192.168.100.100 192.168.100.254;
     default-lease-time         21600;
     max-lease-time             43200;
     next-server                192.168.100.10;
     class "pxeclients" {
          match if substring (option vendor-class-identifier, 0, 9) = "PXEClient";
          if option pxe-system-type = 00:02 {
                  filename "ia64/elilo.efi";
          } else if option pxe-system-type = 00:06 {
                  filename "grub/grub-x86.efi";
          } else if option pxe-system-type = 00:07 {
                  filename "grub/grub-x86_64.efi";
          } else {
                  filename "pxelinux.0";
          }
     }

}

# group for Cobbler DHCP tag: default
group {
}
4.Cobbler导入镜像
我们需要安装什么版本的操作系统,cobbler自己肯定是不会给我们内置的,需要我们自己下载镜像并导入到cobbler,导入一个操作系统进行过程如下。
1、挂载iso文件到系统
[root@node1 ~]# mkdir /data/Centos-7.2-x86_64
[root@node1 ~]# mount -t iso9660 -o loop CentOS-7-x86_64-DVD-1511.iso /data/Centos-7.2-x86_64
2、导入镜像文件到cobbler
[root@node1 ~]# cobbler import --path=/data/Centos-7.2-x86_64/ --name=Centos-7.2-x86_64 --arch=x86_64
task started: 2016-11-19_170133_import
task started (id=Media import, time=Sat Nov 19 17:01:33 2016)
Found a candidate signature: breed=redhat, version=rhel6
Found a candidate signature: breed=redhat, version=rhel7
Found a matching signature: breed=redhat, version=rhel7
Adding distros from path /var/www/cobbler/ks_mirror/Centos-7.2-x86_64:
creating new distro: Centos-7.2-x86_64
trying symlink: /var/www/cobbler/ks_mirror/Centos-7.2-x86_64 -> /var/www/cobbler/links/Centos-7.2-x86_64
creating new profile: Centos-7.2-x86_64
associating repos
checking for rsync repo(s)
checking for rhn repo(s)
checking for yum repo(s)
starting descent into /var/www/cobbler/ks_mirror/Centos-7.2-x86_64 for Centos-7.2-x86_64
processing repo at : /var/www/cobbler/ks_mirror/Centos-7.2-x86_64
need to process repo/comps: /var/www/cobbler/ks_mirror/Centos-7.2-x86_64
looking for /var/www/cobbler/ks_mirror/Centos-7.2-x86_64/repodata/*comps*.xml
Keeping repodata as-is :/var/www/cobbler/ks_mirror/Centos-7.2-x86_64/repodata
*** TASK COMPLETE ***
查看cobbler已经有了一个安装源
[root@node1 ~]# cobbler profile list
   Centos-7.2-x86_64
使用如下命令可以获取到cobbler命令详细报表,但是里面的ks文件还不是我们想要的,所以下面需要修改成自己公司的ks文件
[root@node1 ~]# cobbler profile report
Name                           : Centos-7.2-x86_64
TFTP Boot Files                : {}
Comment                        :
DHCP Tag                       : default
Distribution                   : Centos-7.2-x86_64
Enable gPXE?                   : 0
Enable PXE Menu?               : 1
Fetchable Files                : {}
Kernel Options                 : {}
Kernel Options (Post Install)  : {}
Kickstart                      : /var/lib/cobbler/kickstarts/sample_end.ks
Kickstart Metadata             : {}
Management Classes             : []
Management Parameters          : <<inherit>>
Name Servers                   : []
Name Servers Search Path       : []
Owners                         : ['admin']
Parent Profile                 :
Internal proxy                 :
Red Hat Management Key         : <<inherit>>
Red Hat Management Server      : <<inherit>>
Repos                          : []
Server Override                : <<inherit>>
Template Files                 : {}
Virt Auto Boot                 : 1
Virt Bridge                    : xenbr0
Virt CPUs                      : 1
Virt Disk Driver Type          : raw
Virt File Size(GB)             : 5
Virt Path                      :
Virt RAM (MB)                  : 512
Virt Type                      : kvm
5.Kickstart文件生成
(1)安装system-config-kickstart软件,可以通过图形界面配置操作系统安装信息
[root@node1 ~]# yum -y install system-config-kickstart.noarch
(2)执行如下命令打开kickstart配置的图形界面。
[root@node1 ~]# system-config-kickstart
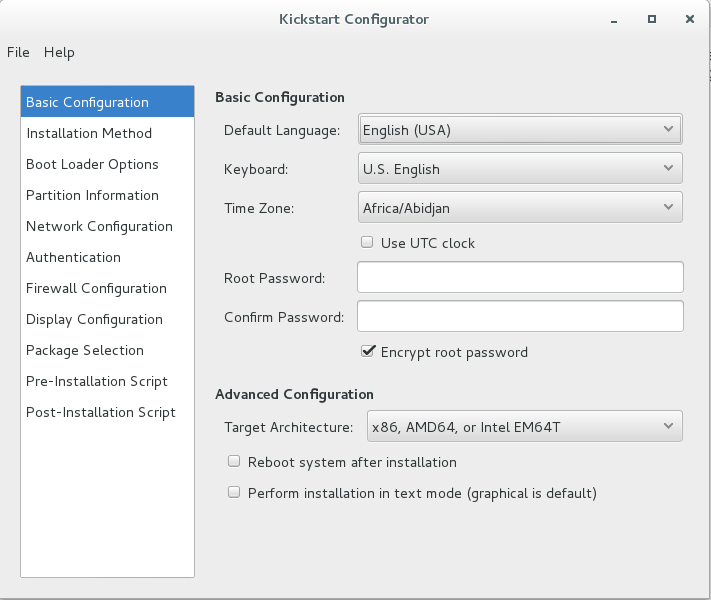
Kickstart文件具体参数这里就不说明了,只说几个特殊的配置:
(1)Root密码使用cobbler设置的root密码;
(2)URL地址(也就是安装源)设置为$tree表示自动获取;
(3)网卡配置也无须手动配置而是由cobbler进行配置。
rootpw --iscrypted $default_password_crypted
url --url=$tree
$SNIPPET('network_config')
复制kickstart文件到cobbler kickstart文件下
[root@node1 ~]# cp CentOS-7.2-x86_64.cfg /var/lib/cobbler/kickstarts/
修改Centos-7.2-x86_64的kickstart文件
[root@node1 ~]# cobbler profile edit --name Centos-7.2-x86_64 --kickstart=/var/lib/cobbler/kickstarts/CentOS-7.2-x86_64.cfg
[root@node1 ~]# cobbler profile report | grep Kickstart
Kickstart                      : /var/lib/cobbler/kickstarts/CentOS-7.2-x86_64.cfg
Kickstart Metadata             : {}
设置完成使用cobbler sync进行同步配置
6.在装机时设置Centos7网卡为eth0
Centos7系统默认的网卡名称不是eth0,如果需要修改为eth0需要通过修改内核参数实现,这里我们可以在装机的时候进行配置Centos7的网卡名称为eth0
[root@node1 ~]# cobbler profile edit --name=Centos-7.2-x86_64 --kopts='net.ifnames=0 biosdevname=0'
[root@node1 ~]# cobbler sync
7.设置cobbler引导页面
修改cobbler安装提示(非必须):将默认的github替换为我blog的地址
[root@node1 ~]# cat /etc/cobbler/pxe/pxedefault.template
DEFAULT menu
PROMPT 0
MENU TITLE Cobbler | www.fblinux.com
TIMEOUT 200
TOTALTIMEOUT 6000
ONTIMEOUT $pxe_timeout_profile

LABEL local
        MENU LABEL (local)
        MENU DEFAULT
        LOCALBOOT -1

$pxe_menu_items

MENU end
设置完成使用cobbler sync进行同步配置
8.系统安装
Cobbler安装系统之前注意:
(1)你的所有服务器最好都在单独的vlan中存放。
(2)保证网络中只有一个dhcp。
(3)记录需要安装操作系统的mac地址。
(4)关闭cobbler服务器的防火墙
我们记录到服务器的mac地址之后,就可以定义服务器的IP信息,安装的操作系统,然后服务器从网络启动就会自动安装操作系统,定义命令如下。
cobbler system add --name=linux-node1 --mac=00:0C:29:B8:B2:36 --profile=Centos-7.2-x86_64 --ip-address=192.168.100.110 --subnet=255.255.255.0 --gateway=192.168.100.2 --interface=eth0 --static=1 --hostname=test1.fblinux.com --name-servers="114.114.114.114" --kickstart=/var/lib/cobbler/kickstarts/CentOS-7.2-x86_64.cfg
如果我们处于特殊情况,无法获取到服务器的mac地址,那么我们直接把服务器从网络启动,就会出现cobbler安装界面,默认从local启动(不用担心服务器重启,会重做系统),这时我们选择下面的Centos-7.2选项就会自动安装操作系统了。

9.自动化重装Koan介绍
9.1.Koan介绍
如果我们有一台Centos6服务器需要安装成Centos7的操作系统,那么这台服务器就需要修改成网络启动,这样还是比较麻烦的;我们可以通过koan只需要一条命令就实现了操作系统的重新安装。
9.2.Koan配置
注意:如下操作不是在cobbler执行,而是在需要重装系统的服务器执行
需要配置好epel的安装源,安装koan
[root@localhost ~]# yum -y install koan
通过如下命令列出cobbler的profile(安装源),看看能够重新安装的操作系统。
[root@localhost ~]# koan --server=192.168.100.10 --list=profiles
- looking for Cobbler at http://192.168.100.10:80/cobbler_api
Centos-7.2-x86_64
设置下次重装成Centos-7.2-x86_64的操作系统
[root@localhost ~]# koan --replace-self --server=192.168.100.10 --profile=Centos-7.2-x86_64
配置完成之后使用reboot重启服务器,就会通过cobbler自动把服务器安装成Centos7的操作系统。
10.添加CentOS-6.8安装源
前面我们已经添加了一个Centos7.2的安装源,我们现在需要在添加一个Centos6.8的安装源,操作方式如下
(1)挂载镜像到文件系统
mkdir /data/CentOS-6.8-x86_64
mount -t iso9660 -o loop CentOS-6.8-x86_64-bin-DVD1.iso /data/CentOS-6.8-x86_64/
(2)导入镜像到cobbler
[root@cobbler ~]# cobbler import --path=/data/CentOS-6.8-x86_64/ --name=CentOS-6.8-x86_64 --arch=x86_64
(3)查看新添加的镜像
[root@cobbler ~]# cobbler profile list
   CentOS-6.8-x86_64
   Centos-7.2-x86_64
(4)设置centos6.8的kickstart文件
[root@cobbler ~]# cobbler profile edit --name CentOS-6.8-x86_64 --kickstart=/var/lib/cobbler/kickstarts/CentOS-6.8-x86_64.cfg
[root@cobbler ~]# cobbler profile report --name CentOS-6.8-x86_64 | grep kickstart
Kickstart                      : /var/lib/cobbler/kickstarts/CentOS-6.8-x86_64.cfg
(5)同步cobbler配置
[root@cobbler ~]# cobbler sync
转载请注明:西门飞冰的博客 » 基于cobbler的自动化安装实践